
Configure the interface settings for this product.
Display a list of interface settings #
Displays a list of interface settings.
The "Interface Settings" screen displays a list of registered interface settings.
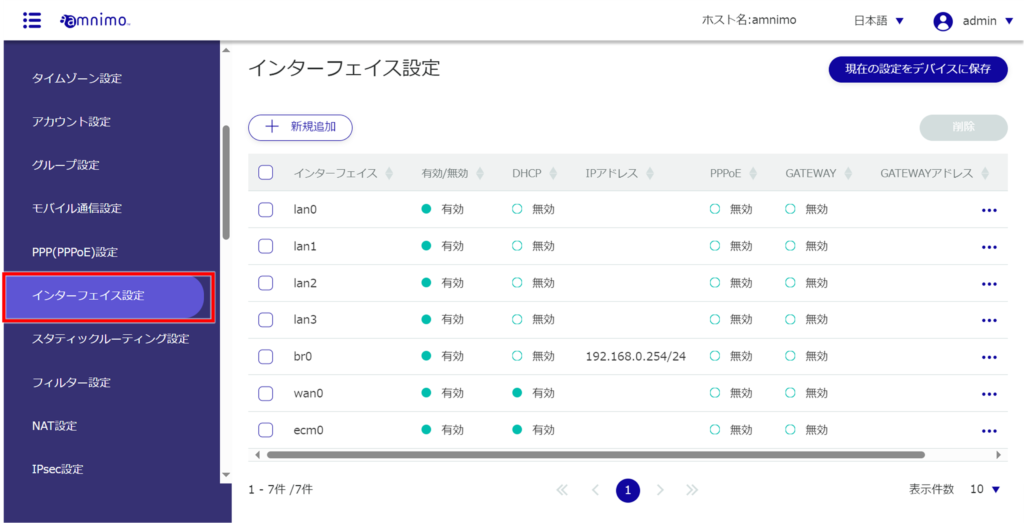
By clicking tabs such as "Interface" and "Enable/Disable" in the interface settings list, you can sort the interface settings in descending/ascending order for each item.

Adding Interfaces #
Add interface settings.
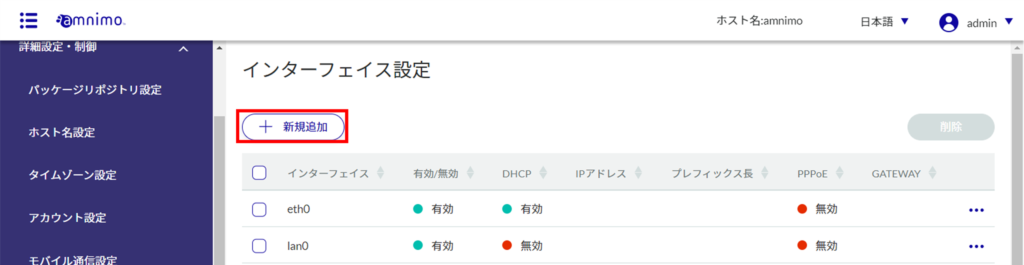
The "Add Interface" screen will appear.
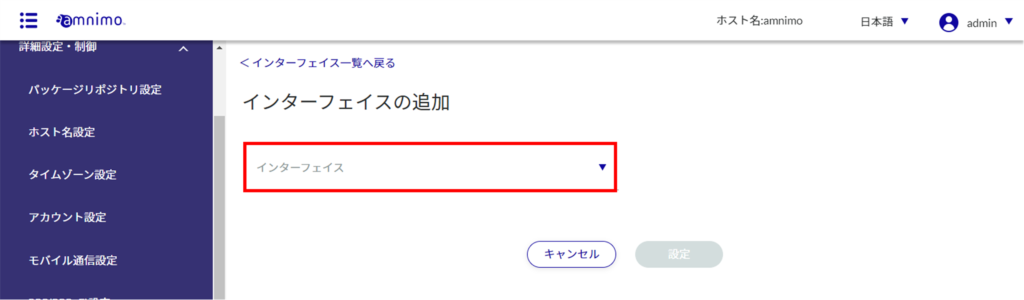
The setting items vary depending on the selected interface.
Adding eth0
This is how to configure the settings when the eth0 interface is selected.
For AI edge gateways, this section should operate on wan0, not eth0.
Click the toggle to switch between "Enable" and "Disable".

❷ If DHCP (IPv4) is checked, select the DNS priority and ROUTE metric.
DNS優先度は0~99の範囲で設定します。デフォルト値は30です。
ROUTEメトリックは0~255の範囲で設定します。デフォルト値は30です。

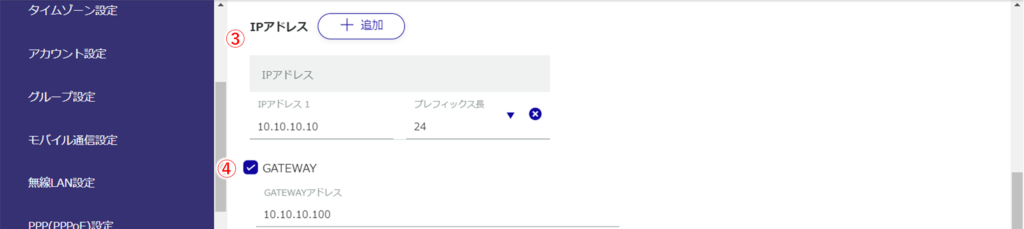
❸ If Fixed (IPv4) is checked, specify the IP address, prefix length, and GATEWAY.
For firmware version v2.1.0 or later, the display will show "IP Address" and there will be no check box. if you enter an IP address (you can set more than one by clicking the "Add" button), set the prefix length. if you check GATEWAY, Set the IP address to be the default gateway.

❹ If dynamic SNAT is checked, select MTU and link mode.
MTU is set in the range of 576 to 9676. Default value is 1500.

❺ Enable PROXY-ARP if necessary.
❻ If necessary, enable the interface startup wait disable function during equipment startup (compact routers (amnimo C series) do not have this function).

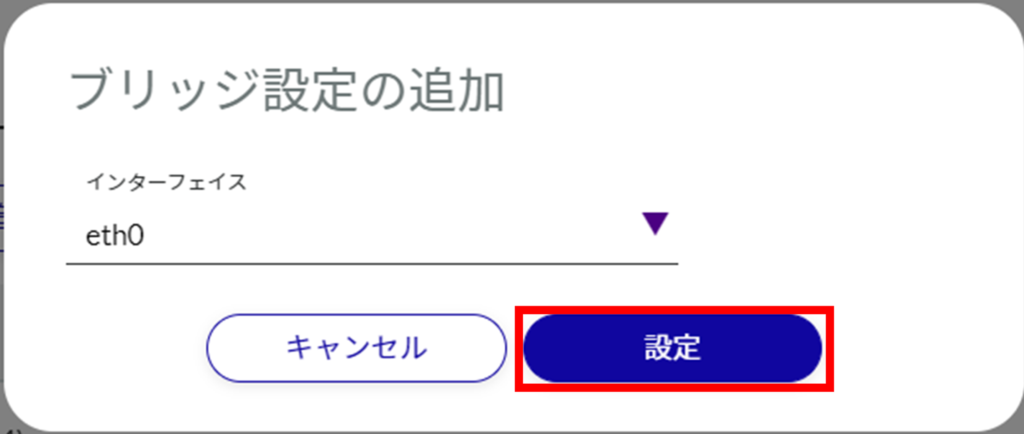
Add br0
This is how to set up the br0 interface when it is selected.
Click the toggle to switch between "Enable" and "Disable".

❷ The [Add New] button in the bridge settings list allows you to add an interface to be bridged.
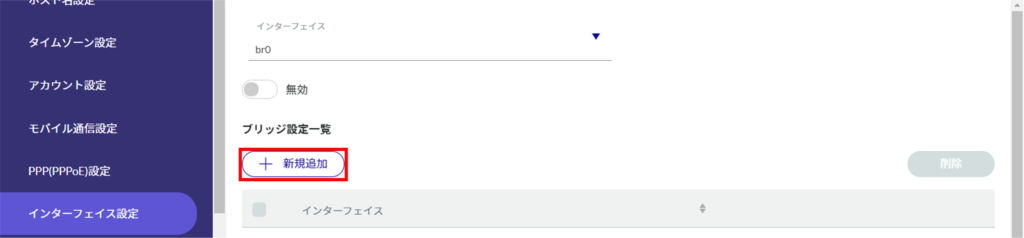
To add, select an interface and click Settings.
❸ If DHCP (IPv4) is checked, select the DNS priority and ROUTE metric.
DNS優先度は0~99の範囲で設定します。デフォルト値は30です。
ROUTEメトリックは0~255の範囲で設定します。デフォルト値は30です。

❹ If Fixed (IPv4) is checked, specify IP address, prefix length, and GATEWAY.
- For firmware version v2.1.0 or later, the display will show "IP address" and there will be no check box.
- If an IP address (multiple can be set by clicking the "Add" button) is entered, set the prefix length.
- If GATEWAY is checked, set the IP address that will be the default gateway.

❺ If dynamic SNAT is checked, select MTU.
MTU is set in the range of 576 to 9676. Default value is 1500.

❻ Enable PROXY-ARP if necessary.

❼ If necessary, enable the interface startup wait disable function at equipment startup.
Only appears on Edge Gateway (amnimo G series) and IoT Router (amnimo R series) firmware v1.X.X.

Addition of lan0 to lan3
This is how to configure the settings when lan0 to lan3 interfaces are selected.
Click the toggle to switch between "Enable" and "Disable".

❷ If DHCP (IPv4) is checked, select the DNS priority and ROUTE metric.
*Only for compact routers with wireless LAN (AC15 and AC25).
DNS優先度は0~99の範囲で設定します。デフォルト値は30です。
ROUTEメトリックは0~255の範囲で設定します。デフォルト値は30です。

❸ Enter the IP address (multiple settings are possible by clicking the "Add" button) and set the prefix length. *Only for compact routers with wireless LAN (AC15 and AC25).
❹ If GATEWAY is checked, set the IP address to be the default gateway. *Only for compact routers with wireless LAN (AC15, AC25).

❺ If dynamic SNAT is checked, select MTU. *Only for compact routers with wireless LAN (AC15 and AC25).
MTU is set in the range of 576 to 9676. Default value is 1500.

❻ Select the link mode.
❼ Enable PROXY-ARP if necessary. *Only for compact routers with wireless LAN (AC15 and AC25).

Add ecm0 / rmnet_data0
ecm0のインターフェイスを選択した場合の設定方法です。
コンパクトルーターをご利用の場合は、ecm0をrmnet_data0に読み換えてください。
Click the toggle to switch between "Enable" and "Disable".

❷ Select the mobile line name.
You can select the mobile line name set in [ Advanced Settings and Control ] - [ Mobile Communication Settings ].

❸ If DHCP (IPv4) is checked, select the DNS priority and ROUTE metric.
DNS優先度は0~99の範囲で設定します。デフォルト値は30です。
ROUTEメトリックは0~255の範囲で設定します。デフォルト値は30です。

❹ If dynamic SNAT is checked, select MTU.
MTU is set in the range of 576 to 9676. Default value is 1500.

❺ Enable PROXY-ARP if necessary.

❻ If necessary, enable the interface startup wait disable function at equipment startup.
Only appears on Edge Gateway (amnimo G series) and IoT Router (amnimo R series) firmware v1.X.X.

Addition of ppp0
This is how to set up the ppp0 interface when it is selected.
Click the toggle to switch between "Enable" and "Disable".

Select the name of the ppp line.
You can select the ppp line name set in [ Advanced Configuration and Control ] - [ PPP (PPPoE) Settings ].

❸ If PPPoE (Ipv4) is checked, select the DNS priority and ROUTE metric.
DNS優先度は0~99の範囲で設定します。デフォルト値は20です。
ROUTEメトリックは0~255の範囲で設定します。デフォルト値は20です。

❹ If dynamic SNAT is checked, select MTU.
MTU is set in the range of 576 to 9676. The default value is 1454.

❺ Enable PROXY-ARP if necessary.
❻ If necessary, enable the interface startup wait disable function at equipment startup.

Addition of wlan0 to wlan1
This is how to set the wlan0 to wlan1 interface when selected.
Click the toggle to switch between "Enable" and "Disable".

Select the mode.
When access point mode is selected, be sure to correspond the interface and SSID as follows
- wlan0: amnimo-2G-xxxxxxxx
- wlan1: amnimo-5G-xxxxxxxx
Station mode is available only on interface "wlan0".

❸ Enter the IP address (multiple settings are possible by clicking the "Add" button) and set the prefix length.
❹ If GATEWAY is checked, set the IP address that will be the default gateway.
❺ If dynamic SNAT is checked, select MTU.
MTU is set in the range of 576 to 9676. Default value is 1500.

❻ Enable PROXY-ARP if necessary.

Editing the Interface #
Edit the registered interface settings.
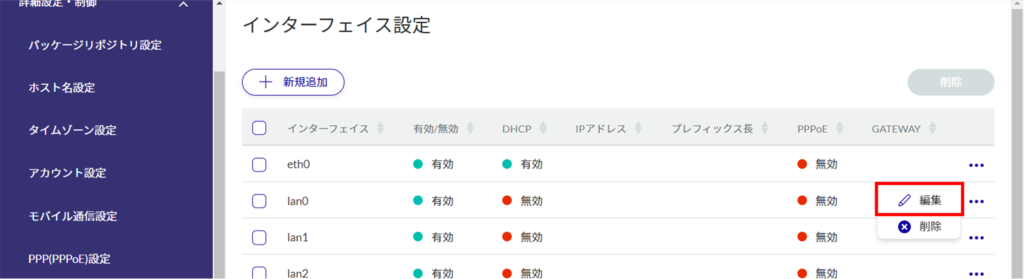
The "Edit Interface Settings" screen appears.
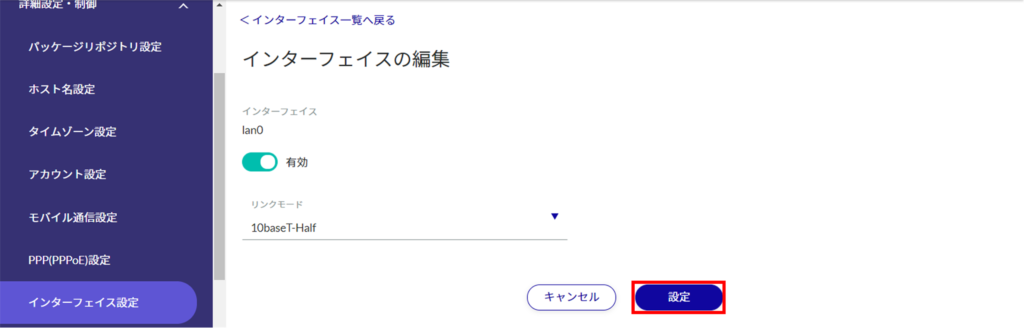
Information on interface settings is updated.
Since the IP address will be changed, please access the new URL after the setup is complete.
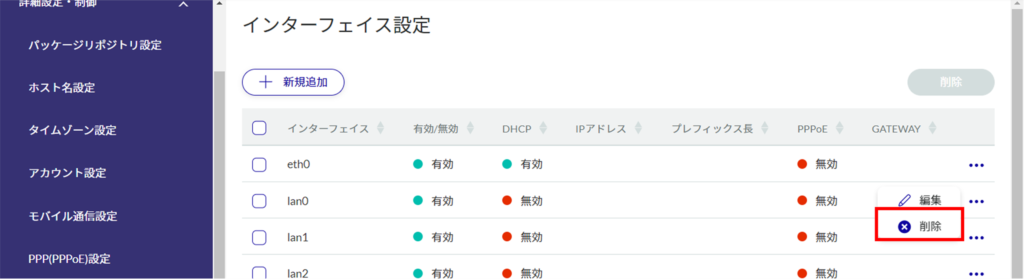
Delete interface #
To delete registered interfaces, you can either delete them individually from the interface operation menu, or you can delete them after selecting all the interfaces you wish to delete.
Delete individual interfaces
This method is to select Delete from the operation menu of the interface.
The "Confirmation" screen appears.
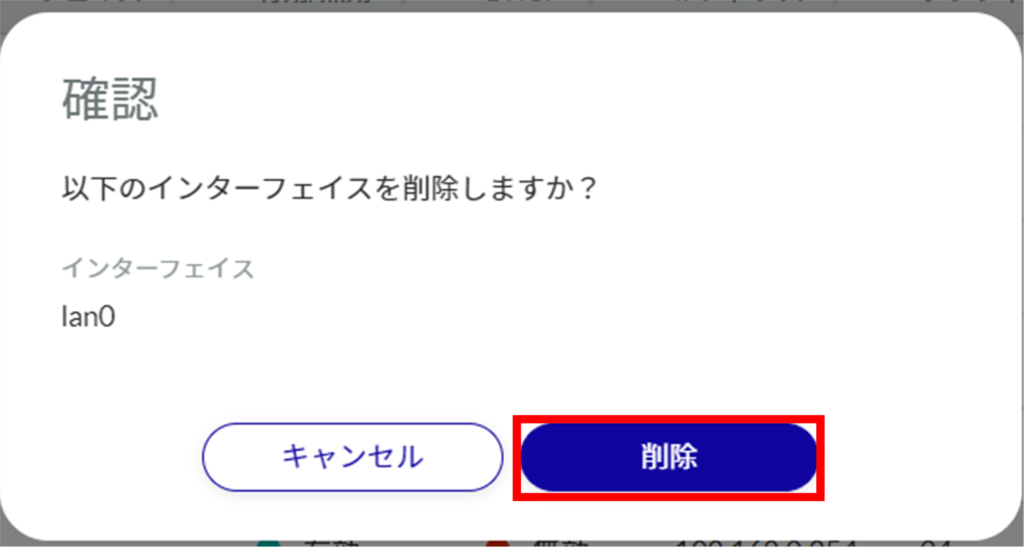
interface will be removed.
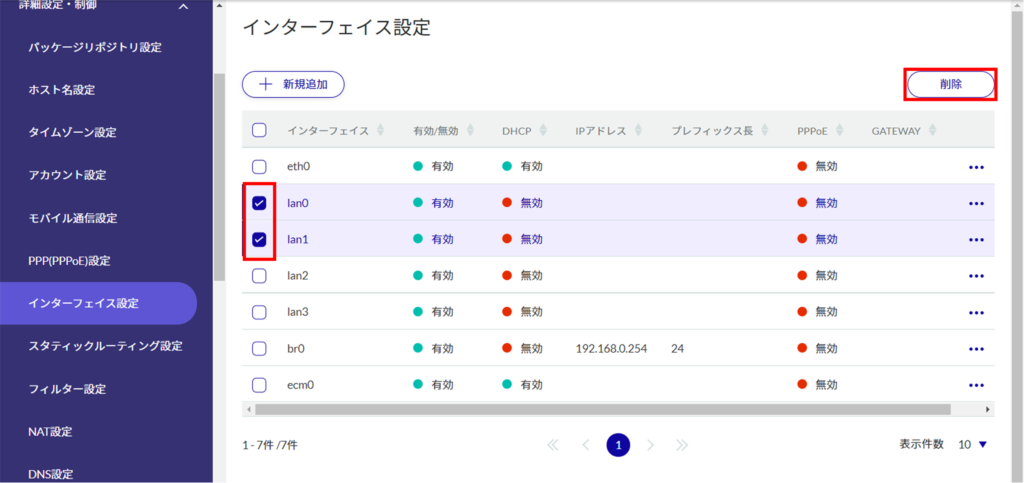
Selecting and deleting multiple interfaces
This method is used to check the interfaces to be deleted before deleting them. This is useful when deleting multiple interfaces at once. You can also select a single interface to delete.
The "Confirmation" screen appears.
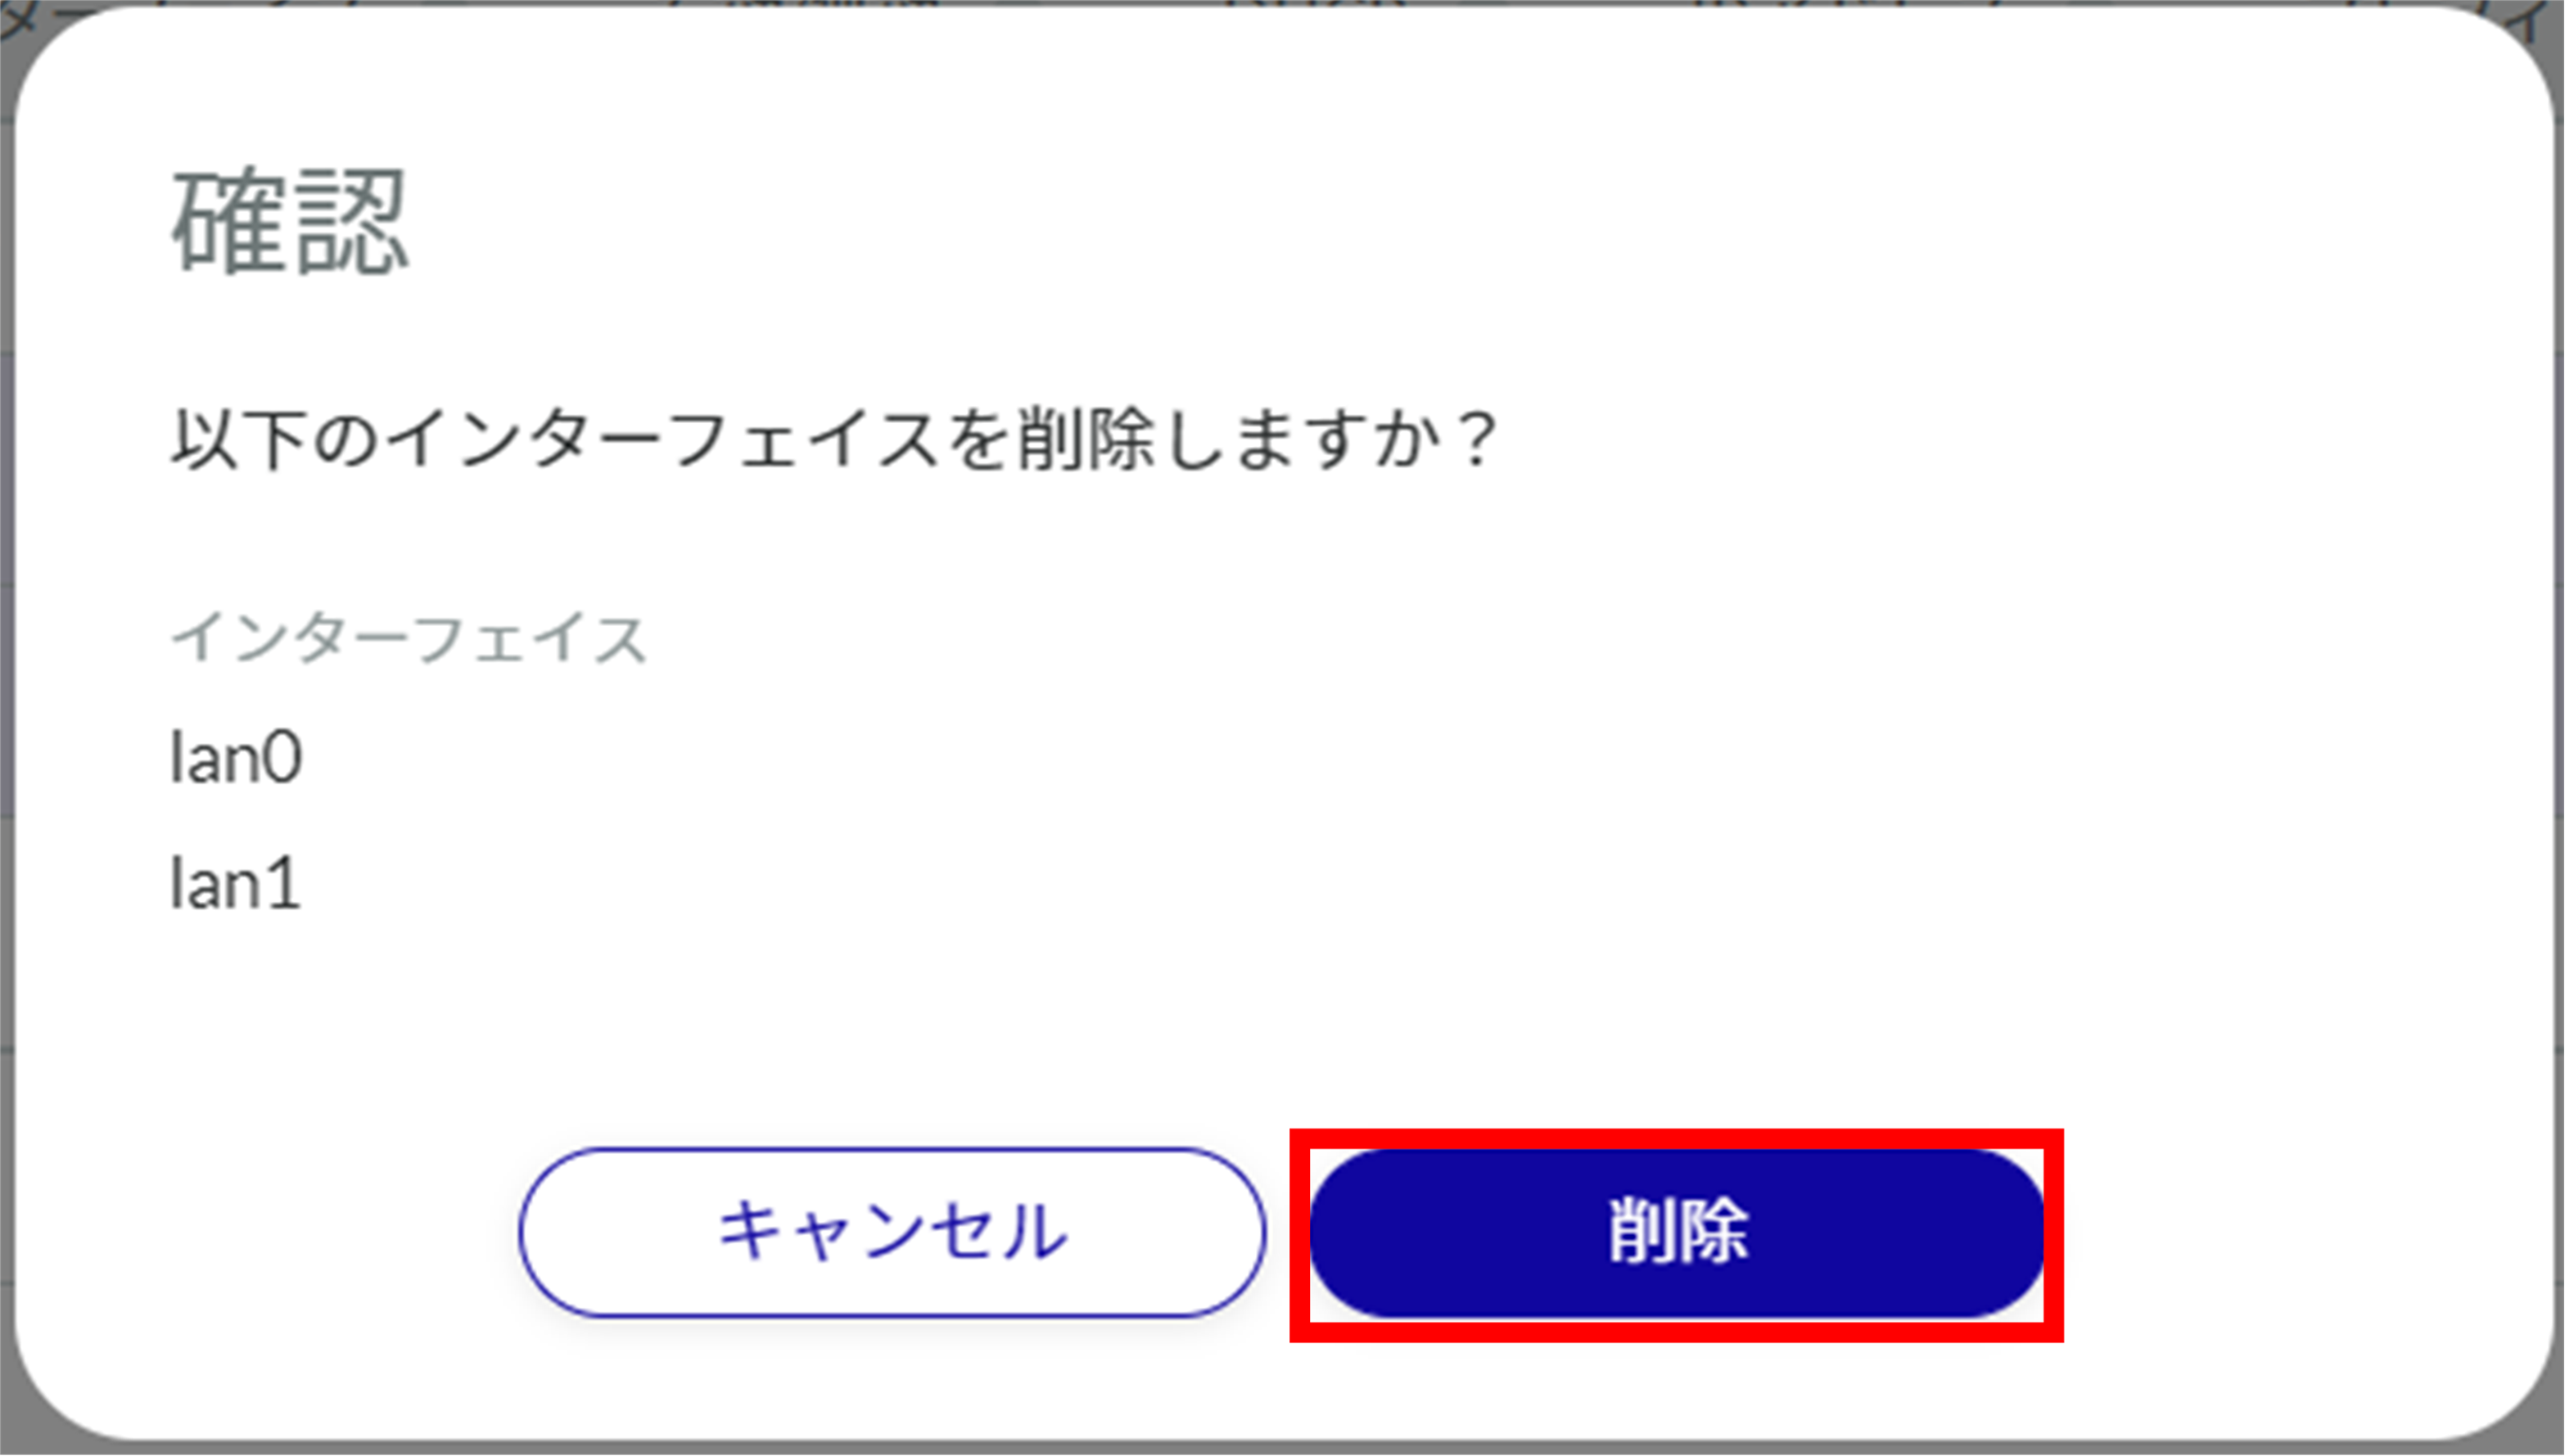
The selected interface is deleted.